Unity/Futile Pong Example (Part 9) – Adding some polish and calling it a game

By the end of this tutorial, you should have something that looks like this. You can download the Assets folder for this tutorial here.
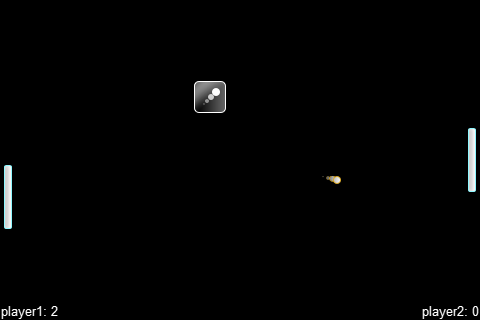
The last tutorial attempted to separate itself from the classic Pong game a bit by adding a powerup that the ball can collide with. I would like to wrap up the Pong tutorial series by adding some very minor details to the game that can make a big difference. I won’t be covering all of the changes here in depth, because they don’t introduce any new Futile-specific concepts, but I did want to add some shine and end the series with a bit of a flourish. All assets and code are available as a zip archive, just like in every other tutorial.

Here is a preview.

final_product

An incredibly easy way to give some life to our game is by adding a ball trail.

In the PDBall.cs file, replace the contents with the code below.

using UnityEngine;
using System.Collections;
  
public class PDBall : FSprite {
    public float xVelocity;
    public float yVelocity;
    public float defaultVelocity;
    public float currentVelocity;
	
	public FSprite[] ballTrail;
     
    public PDBall() : base("ball") {
        defaultVelocity = 300.0f;
        currentVelocity = defaultVelocity;
		
		// Instantiate and customize our ball trail sprites
		ballTrail = new FSprite[3];
		for (int x=0; x < 3; x++) {
			ballTrail[x] = new FSprite("ball");
			ballTrail[x].scale = 0.25f + (x * 0.25f);
			ballTrail[x].alpha = 0.25f + (x * 0.25f);
			Futile.stage.AddChild(ballTrail[x]);
		}
		
    }
	
	override public void Redraw(bool shouldForceDirty, bool shouldUpdateDepth)
	{
		// Set the position of each ball to the position of the ball ahead of it
		ballTrail[0].SetPosition(ballTrail[1].GetPosition());
		ballTrail[1].SetPosition(ballTrail[2].GetPosition());
		ballTrail[2].SetPosition(this.GetPosition());
		base.Redraw(shouldForceDirty, shouldUpdateDepth);
	}
}

In the code above, we are creating three instances of an FSprite from ball.png in the sprite atlas. All three will be scaled differently with different alphas to give the impression that we’re seeing a motion trail. We then override the Redraw function the same way we did when creating an animated sprite, and adjust the positions of each ball in our trail.

So simple, yet so effective, in my opinion. Execute the code and give it a look.

balltrail

Next, I utilized GoKit, which is packaged with Futile, to create a countdown timer whenever the ball spawns. If you’re familiar with any Tweening library, you’ll be familiar with it. I won’t go into much detail about it, but you can replace your entire PDGame.cs file with the following code to replicate it.

using UnityEngine;
using System.Collections;

public class PDGame {
	public PDPaddle player1;
	public PDPaddle player2;
	public PDBall ball;
	public FLabel lblScore1;
	public FLabel lblScore2;
	public bool paused = true; // Is the game state paused?
	public bool roundRestart = true;
	public int maxScore = 5; // Points needed to win the game
	public PDPowerup powerup;
	public FLabel lblCountdown;
	
	
	public PDGame() {
        player1 = new PDPaddle("player1");  // Create player1
        player2 = new PDPaddle("player2");  // Create player2
        ResetPaddles();                     // Reset the position of the paddles
         
        ball = new PDBall();                // Create our ball
        ResetBall();                        // Reset the position of the ball to the center of the screen
         
        Futile.stage.AddChild(player1);     // Add our elements to the stage, making them visible
        Futile.stage.AddChild(player2);
        Futile.stage.AddChild(ball);
		
		// Create player1's score label
		lblScore1 = new FLabel("arial", player1.name + ": " + player1.score);
		lblScore1.anchorX = 0; // Anchor the label at the left edge
		lblScore1.anchorY = 0; // Anchor the label at the bottom edge
		lblScore1.x = -Futile.screen.halfWidth; // Move the label to the far left hand side of the screen
		lblScore1.y = -Futile.screen.halfHeight; // Move the label to the bottom of the screen
		
		// Create player2's score label
		lblScore2 = new FLabel("arial", player2.name + ": " + player2.score);
		lblScore2.anchorX = 1.0f; // Anchor the label at the right edge
		lblScore2.anchorY = 0; // Anchor the label at the bottom edge
		lblScore2.x = Futile.screen.halfWidth; // Move the label to the far right hand side of the screen
		lblScore2.y = -Futile.screen.halfHeight; // Move the label to the bottom of the screen
		
		// Add the labels to the stage
		Futile.stage.AddChild(lblScore1);
		Futile.stage.AddChild(lblScore2);
		
		// Create the Countdown label
		lblCountdown = new FLabel("arial", "");
		lblCountdown.scale = 0f;
		Futile.stage.AddChild(lblCountdown);
		
		// Position and render the powerup
		powerup = new PDPowerup();
		ResetPowerup();
		Futile.stage.AddChild(powerup);


    }
	
	public void ResetPowerup() {
		powerup.x = Futile.screen.halfWidth/2 - (Futile.screen.halfWidth * RXRandom.Float());
		powerup.y = (Futile.screen.halfHeight - powerup.height/2) - ((Futile.screen.height - powerup.height) * RXRandom.Float());
	}
	
	public void Update(float dt) {
		if (roundRestart) {
			lblCountdown.text = "3";
			ball.isVisible = false;
			ball.ballTrail[0].isVisible = false;
			ball.ballTrail[1].isVisible = false;
			ball.ballTrail[2].isVisible = false;
			powerup.isVisible = false;
			Tween twThree = new Tween(lblCountdown, 0.35f, new TweenConfig().setIterations(2, LoopType.PingPong).floatProp("scale", 5.0f).onComplete(thisTween => lblCountdown.text="2" ));
			Tween twTwo = new Tween(lblCountdown, 0.35f, new TweenConfig().setIterations(2, LoopType.PingPong).floatProp("scale", 5.0f).onComplete(thisTween => lblCountdown.text="1" ));
			Tween twOne = new Tween(lblCountdown, 0.35f, new TweenConfig().setIterations(2, LoopType.PingPong).floatProp("scale", 5.0f).onComplete(thisTween => lblCountdown.text="GO!" ));
			Tween twGo = new Tween(lblCountdown, 0.35f, new TweenConfig().setIterations(2, LoopType.PingPong).floatProp("scale", 5.0f).onComplete(thisTween => { paused = false; ball.isVisible = true; ball.ballTrail[0].isVisible = true; ball.ballTrail[1].isVisible = true; ball.ballTrail[2].isVisible = true; powerup.isVisible = true; } ));
			
			TweenChain twChain = new TweenChain();
			twChain.append(twThree).append(twTwo).append(twOne).append(twGo);
			twChain.play();
			roundRestart = false;
			ResetBall();
			ResetPaddles();
		}
		
		if (!paused) {
		    float newPlayer1Y = player1.y;
		    float newPlayer2Y = player2.y;
		     
		    // Handle Input
		    if (Input.GetKey("w")) { newPlayer1Y += dt * player1.currentVelocity; }
		    if (Input.GetKey("s")) { newPlayer1Y -= dt * player1.currentVelocity; }
		    if (Input.GetKey("up")) { newPlayer2Y += dt * player2.currentVelocity; }
		    if (Input.GetKey("down")) { newPlayer2Y -= dt * player2.currentVelocity; }
		     
		    // Integrate to find the new x and y values for the ball
		    float newBallX = ball.x + dt * ball.xVelocity;
		    float newBallY = ball.y + dt * ball.yVelocity;
			
		    // Check for ball-and-wall collisions
		    if (newBallY + (ball.height/2) >= Futile.screen.halfHeight) {
				newBallY = Futile.screen.halfHeight - (ball.height/2) - Mathf.Abs((newBallY - Futile.screen.halfHeight));
				ball.yVelocity = -ball.yVelocity;
			} else if (newBallY - ball.height/2 <= -Futile.screen.halfHeight) {
				newBallY = -Futile.screen.halfHeight + (ball.height/2) + Mathf.Abs((-Futile.screen.halfHeight - newBallY));
		        ball.yVelocity = -ball.yVelocity;
		    }
			
			// Check for paddle-and-ball collisions
			Rect ballRect = ball.localRect.CloneAndOffset(newBallX, newBallY);
			Rect player1Rect = player1.localRect.CloneAndOffset(player1.x, newPlayer1Y);
			Rect player2Rect = player2.localRect.CloneAndOffset(player2.x, newPlayer2Y);
			 
			if (ballRect.CheckIntersect(player1Rect) && ball.xVelocity < 0) {
			    BallPaddleCollision(player1, newBallY, newPlayer1Y);
			}
			if (ballRect.CheckIntersect(player2Rect) && ball.xVelocity > 0) {
			    BallPaddleCollision(player2, newBallY, newPlayer2Y);
			}
			
			// Check for ball-and-powerup collisions
			Rect powerupRect = powerup.localRect.CloneAndOffset(powerup.x, powerup.y);
			if (ballRect.CheckIntersect(powerupRect)) {
				ResetPowerup();
				ball.currentVelocity+= 25.0f;
			}
			
			
			// Render the ball and paddles at their new locations
		    ball.x = newBallX;
		    ball.y = newBallY;
		    player1.y = newPlayer1Y;
		    player2.y = newPlayer2Y;
			
			// Scoring conditions
			PDPaddle scoringPlayer = null; // No one scored yet, but we need to create a reference
			
			if (newBallX - ball.width/2 < -Futile.screen.halfWidth) { // If the right side of the ball leaves the left side of the screen, player2 scored
				scoringPlayer = player2;
			} else if (newBallX + ball.width/2 > Futile.screen.halfWidth) { // If the left side of the ball leaves the right side of the screen, player1 scored
				scoringPlayer = player1;
			}
			
			// Reset the board if someone scores, and handle win/scoring conditions
			if (scoringPlayer != null) {
				scoringPlayer.score++; // Increment the scoring player's score
				lblScore1.text = player1.name + ": " + player1.score; // Update our labels, regardless of who scored
				lblScore2.text = player2.name + ": " + player2.score;
				
				// If the scoring player won
				if (scoringPlayer.score >= maxScore) {
					paused = true; // Pause our update loop
					Futile.stage.RemoveAllChildren(); // Remove all sprites from the screen
					FLabel lblWinner = new FLabel("arial", scoringPlayer.name + " WINS!"); // Create a label declaring the winner
					Futile.stage.AddChild(lblWinner); // Display the label
				} else {
					roundRestart = true;
					paused = true;
				}
			}
		}
	}
	
	public void BallPaddleCollision(PDPaddle player, float newBallY, float newPaddleY) {
	    float localHitLoc = newBallY - newPaddleY; // Where did the ball hit, relative to the paddle's center?
	    float angleMultiplier = Mathf.Abs(localHitLoc / (player.height/2)); // Express local hit loc as a percentage of half the paddle's height
	     
	    // Use the angle multiplier to determine the angle the ball should return at, from 0-65 degrees. Then use trig functions to determine new x/y velocities. Feel free to use a different angle limit if you think another one works better.
	    float xVelocity = Mathf.Cos(65.0f * angleMultiplier * Mathf.Deg2Rad) * ball.currentVelocity; 
	    float yVelocity = Mathf.Sin(65.0f * angleMultiplier * Mathf.Deg2Rad) * ball.currentVelocity;
	     
	    // If the ball hit the paddle below the center, the yVelocity should be flipped so that the ball is returned at a downward angle
	    if (localHitLoc < 0) {
	        yVelocity = -yVelocity;
	    }
	     
	    // If the ball came in at an xVelocity of more than 0, we know the ball was travelling right when it hit the paddle. It should now start going left.        
	    if (ball.xVelocity > 0) {
	        xVelocity = -xVelocity;
	    }
	     
	    // Set the ball's x and y velocities to the newly calculated values
	    ball.xVelocity = xVelocity;
	    ball.yVelocity = yVelocity;
	}
	
	public void ResetPaddles() {
		player1.x = -Futile.screen.halfWidth + player1.width;	// Make sure player1 to the left side of screen
		player1.y = 0;											// Recenter player1 vertically
		
		player2.x = Futile.screen.halfWidth - player2.width;	// Make sure player2 is on the right side of the screen
		player2.y = 0;											// Recenter player2 vertically
	}
	
	public void ResetBall() {
	    ball.x = 0; // Place ball in the center of the screen
	    ball.y = 0;
		
		// Reset ball speed to default
		ball.currentVelocity = ball.defaultVelocity;
		
	    // Ensure that the ball starts at a random angle that is never greater than 45 degrees from 0 in either direction
	    ball.yVelocity = (ball.defaultVelocity/2) - (RXRandom.Float() * ball.defaultVelocity);
	    // Make sure that the defaultVelocity (hypotenuse) is honored by setting the xVelocity accordingly, then choose a random horizontal direction
	    ball.xVelocity = Mathf.Sqrt((ball.defaultVelocity*ball.defaultVelocity) - (ball.yVelocity*ball.yVelocity)) * (RXRandom.Int(2) * 2 - 1);
	}
}

To end my work with Pong, I touched up the ball, paddle, and powerup assets a bit to create the final product. You can view it by opening the webplayer demo.

I would like to thank everyone who took the time to give Futile a try. MattRix really did create a solid, effective product to assist developers with 2D game development in Unity. I may continue to update this blog with other Futile tutorials, such as introducing FContainers and other concepts, but they will be standalone tutorials.

Finally, I’ll also be updating this blog with information about a game I am working on.

Thanks for reading!

By the end of the tutorial you just read, you should have something that looks like this. You can download the Assets folder for this tutorial here.

Unity/Futile Pong Example (Part 8) – Adding powerups and introducing animated sprites

By the end of this tutorial, you should have something that looks like this. You can download the Assets folder for this tutorial here.

UPDATE: I went back and updated the ball-and-wall collision code in Part 6 of the tutorial series, which is reflected in this webplayer demo and assets file. There was an issue where rapid collisions could occur when the ball struck the wall, because I’m an idiot.

By the end of the last tutorial, we had essentially completed a remake of the game Pong. I would like to wrap things up by adding something that the original Pong did not have, which is powerups.

To keep it as simple as possible, it will be an object placed on the screen that will activate when the ball collides with it. In this case, it will increase the velocity of the ball. I would also like to use this as an opportunity to introduce a method of sprite animation. Futile is a rendering framework first above all else, and author MattRix has made it a point to stress that the application of the rendering is pretty much on the shoulders of developers. For this purpose, there is no animated sprite class. Instead, we’ll create our own. You can download a zip archive of my assets folder so that you do not have to recreate your own.

Actually, we’re going to work with the animated sprite example that MattRix provides in his Banana Game demo. First, create a new C# source file and name it PDPowerup.cs. Replace the contents of that file with the following code.

using UnityEngine;
using System.Collections;

public class PDPowerup : FSprite
{
	static int numFrames = 11; // Number of frames in our animation
	
	private int _frameCount = 0;
	private int _frameIndex = 0;
	private FAtlasElement[] _frameElements;
	
	public PDPowerup () : base("powerup_v_0")
	{
		_frameElements = new FAtlasElement[numFrames];
		
		// Add all of the sprites to our array
		FAtlasManager am = Futile.atlasManager;
		_frameElements[0] = am.GetElementWithName("powerup_v_0");
		_frameElements[1] = am.GetElementWithName("powerup_v_1");
		_frameElements[2] = am.GetElementWithName("powerup_v_2");
		_frameElements[3] = am.GetElementWithName("powerup_v_3");
		_frameElements[4] = am.GetElementWithName("powerup_v_4");	
		_frameElements[5] = am.GetElementWithName("powerup_v_5");	
		_frameElements[6] = am.GetElementWithName("powerup_v_6");	
		_frameElements[7] = am.GetElementWithName("powerup_v_7");	
		_frameElements[8] = am.GetElementWithName("powerup_v_8");	
		_frameElements[9] = am.GetElementWithName("powerup_v_9");	
		_frameElements[10] = am.GetElementWithName("powerup_v_10");	
	}
	
	override public void Redraw(bool shouldForceDirty, bool shouldUpdateDepth)
	{
		if(_frameCount % 5 == 0) //update every 5 frames
		{
			_frameIndex = (_frameIndex+1)%numFrames; //increment the frame but keep it wrapping
			this.element = _frameElements[_frameIndex];
		}
		
		_frameCount++;
		base.Redraw(shouldForceDirty, shouldUpdateDepth);
	}
}

Just like we did with PDPaddle and PDBall, we extend the FSprite class and use the base keyword to pass the sprite’s file name without the extension as a parameter to the superconstructor. In this case, since the rendered sprite will change depending on the spot in the animation loop, the only reason to use the base keyword here is to satisfy the parameter requirements of FSprite.

We create an array of FAtlasElements, which will store each frame of the animated sprite. An FAtlasElement is a Futile class which is used to store information about each sprite in the atlas. Every FSprite has a .element property, which references an FAtlasElement.

In order to actually animate the sprite, we override the Redraw method of FSprite. This method is called every frame, so it is a perfectly reasonable place to hook into. I chose to advance the animation once every 5 frames, which seems okay on the computer I am using. You can also utilize Time.deltaTime here if you do not want your animation to advance based upon the current framerate. Finally, we call the Redraw method so that our FSprite can continue to render properly.

At this point, you could create a new PDPowerup instance and add it to the stage, but since we need to do more than just display the animation, we have to do a bit more work.

I haven’t said anything about this yet, but please be aware that I’m being overzealous with my use of the public access modifier when making declarations, but proper form would be to utilize private declarations in almost all of these cases.

Let’s create a reference to our PDPowerup object by adding the following code to our PDGame class.

	public PDPowerup powerup;

At the bottom of the PDGame constructor, add the following code to instantiate, position, and render the powerup.

		// Position and render the powerup
		powerup = new PDPowerup();
		ResetPowerup();
		Futile.stage.AddChild(powerup);
    }

Now create the ResetPowerup() function we just referenced above.

	public void ResetPowerup() {
		powerup.x = Futile.screen.halfWidth/2 - (Futile.screen.halfWidth * RXRandom.Float());
		powerup.y = (Futile.screen.halfHeight - powerup.height/2) - ((Futile.screen.height - powerup.height) * RXRandom.Float());
	}

Next, let’s add collision detection by adding the following conditional statement under our paddle-and-ball collision check in the Update loop of PDGame.

			// Check for ball-and-powerup collisions
			Rect powerupRect = powerup.localRect.CloneAndOffset(powerup.x, powerup.y);
			if (ballRect.CheckIntersect(powerupRect)) {
				ResetPowerup();
				ball.currentVelocity+= 50.0f;
			}

The powerup will respawn in a new location and the ball’s velocity will increase by 50 points per second whenever a collision is made. Execute the code and you should now see the powerup in action.

In retrospect, I should have made the powerup larger to make it easier to hit. You can easily do this without recreating the textures by playing around with the scale of the powerup.

I’ll be completely wrapping up the Pong tutorial series in Futile with my next post. It won’t introduce any new Futile classes/functions, but it will add a bit more polish to the game. I will add a ball trail, as well as a delay every time the ball spawns.

Take me to the next tutorial!

By the end of the tutorial you just read, you should have something that looks like this. You can download the Assets folder for this tutorial here.

Unity/Futile Pong Example (Part 7) – Scoring conditions and the user interface

By the end of this tutorial, you should have something that looks like this. You can download the Assets folder for this tutorial here.

The last tutorial gave some life to our game by adding collision detection. Unfortunately, we still don’t have any code for checking when one player has managed to get the ball by another player. We’ll cover that in this tutorial, along with finding a suitable way to display scores.

We’ll display scores using the FLabel class provided by Futile. To utilize it, we first need a bitmap font to work with. Then, we need to add it to our texture atlas in TexturePacker. Since I’m currently on my Windows machine, I used BMFont, which is a freeware application. If I was on a Mac, I would use Glyph Designer, which requires a license, but is arguably the best font atlas tool you will come across. I will not be going into detail on using these apps, as plenty of information already exists on them. As with all of my tutorials, I provide a zip file containing all of the assets I use, so you can just grab the new PongDemo.png, PongDemo.txt, and arial.txt file from there if you don’t want to fool around with creating a bitmap font.

Both of these programs create a PNG image, as well as a .fnt file. The .fnt file is similar to PongDemo.txt, in that it provides metadata about how to read and splice the texture. Since Unity will only load text files that end in a .txt extension, I changed the name of arial.fnt to arial.txt. That file will be put in Assets/Resources/Atlases. I then need to add the arial.png file to TexturePacker and then publish the output.

In PongDemo.cs, just beneath our LoadAtlas call, add the following line.

Futile.atlasManager.LoadFont("arial", "arial", "Atlases/arial", 0, 0);

The first parameter is the name we are giving the font, the second is the name of the PNG file referenced in PongDemo.txt, the third is the location of the arial.txt file without the extension, and the last two are x and y offsets.

To create and configure the labels, open PDGame.cs and add the following variable declarations to the PDGame class.

	public FLabel lblScore1;
	public FLabel lblScore2;

Next, in the PDGame() constructor, add the following code after the AddChild calls.

		// Create player1's score label
		lblScore1 = new FLabel("arial", player1.name + ": " + player1.score);
		lblScore1.anchorX = 0; // Anchor the label at the left edge
		lblScore1.anchorY = 0; // Anchor the label at the bottom edge
		lblScore1.x = -Futile.screen.halfWidth; // Move the label to the far left hand side of the screen
		lblScore1.y = -Futile.screen.halfHeight; // Move the label to the bottom of the screen
		
		// Create player2's score label
		lblScore2 = new FLabel("arial", player2.name + ": " + player2.score);
		lblScore2.anchorX = 1.0f; // Anchor the label at the right edge
		lblScore2.anchorY = 0; // Anchor the label at the bottom edge
		lblScore2.x = Futile.screen.halfWidth; // Move the label to the far right hand side of the screen
		lblScore2.y = -Futile.screen.halfHeight; // Move the label to the bottom of the screen
		
		// Add the labels to the stage
		Futile.stage.AddChild(lblScore1);
		Futile.stage.AddChild(lblScore2);

Execute the code, and you will see the labels we added, positioned at the bottom left and bottom right hand corners of the screen.

Next, let’s create the scoring conditions so that we can update the labels when a player scores. After the last line of the Update function for the PDGame class, add the following.

		// Scoring conditions
		PDPaddle scoringPlayer = null; // No one scored yet, but we need to create a reference
		
		if (newBallX - ball.width/2 < -Futile.screen.halfWidth) { // If the right side of the ball leaves the left side of the screen, player2 scored
			scoringPlayer = player2;
		} else if (newBallX + ball.width/2 > Futile.screen.halfWidth) { // If the left side of the ball leaves the right side of the screen, player1 scored
			scoringPlayer = player1;
		}
		
		// Reset the board if someone scores, and handle win/scoring conditions
		if (scoringPlayer != null) {
			ResetBall();
			ResetPaddles();
			scoringPlayer.score++; // Increment the scoring player's score
			lblScore1.text = player1.name + ": " + player1.score; // Update our labels, regardless of who scored
			lblScore2.text = player2.name + ": " + player2.score;
		}

The code speaks for itself for the most part. If the ball leaves the left side of the screen, player2 must have scored, and the inverse is true for player1. Reset the ball, paddles, increment the scoring player’s score, and then update the score labels.

With scoring working properly, let’s add some logic to pick a winner.

Add the following variable declarations to your PDGame class.

	public bool paused = false; // Is the game state paused?
	public int maxScore = 5; // Points needed to win the game

We then want to wrap all of the code inside of the Update function with a conditional statement.

	public void Update(float dt) {
		if (!paused) { ...

Finally, in the code used to catch a scoring conditioned, replace the whole block with the following code.

			// Reset the board if someone scores, and handle win/scoring conditions
			if (scoringPlayer != null) {
				ResetBall();
				ResetPaddles();
				scoringPlayer.score++; // Increment the scoring player's score
				lblScore1.text = player1.name + ": " + player1.score; // Update our labels, regardless of who scored
				lblScore2.text = player2.name + ": " + player2.score;
				
				// If the scoring player won
				if (scoringPlayer.score >= maxScore) {
					paused = true; // Pause our update loop
					Futile.stage.RemoveAllChildren(); // Remove all sprites from the screen
					FLabel lblWinner = new FLabel("arial", scoringPlayer.name + " WINS!"); // Create a label declaring the winner
					Futile.stage.AddChild(lblWinner); // Display the label
				}
			}

When you execute the code, the first player to get to 5 will now win, and the game state will pause and announce the winner.

There really isn’t much more to Pong, but since the purpose of this tutorial series is to introduce readers to Futile, I would like to explore a few more of its features before tinkering with the gameplay anymore. In the next tutorial, I will cover the FContainer class, which will allow us to easily create and manage various game screens, we’re going to start adding a bit of polish to our game. We will be adding a power-up to the game, while simultaneously introducing animated sprites.

Take me to the next tutorial!

By the end of the tutorial you just read, you should have something that looks like this. You can download the Assets folder for this tutorial here.

Unity/Futile Pong Example (Part 6) – Adding collision detection to our Pong game

By the end of this tutorial, you should have something that looks like this. You can download the Assets folder for this tutorial here.

With our paddles and ball moving in the previous tutorial, the next step is to allow the two to interact with one another. We will do this with some very basic collision detection. We must first determine the moment when a paddle collides with a ball, or the ball collides with a wall, and then decide how to react when that happens.

First, let’s handle ball-and-wall collisions. The top and bottom edges of our stage are effectively going to be walls, despite the fact that we don’t actually see them. When the ball touches the top or bottom borders of our game, we want the ball to bounce.

In PDGame.cs, edit the Update function of the PDGame class to reflect the code below.

	public void Update(float dt) {
		float newPlayer1Y = player1.y;
		float newPlayer2Y = player2.y;
		
		// Handle Input
		if (Input.GetKey("w")) { newPlayer1Y += dt * player1.currentVelocity; }
		if (Input.GetKey("s")) { newPlayer1Y -= dt * player1.currentVelocity; }
		if (Input.GetKey("up")) { newPlayer2Y += dt * player2.currentVelocity; }
		if (Input.GetKey("down")) { newPlayer2Y -= dt * player2.currentVelocity; }
		
		// Integrate to find the new x and y values for the ball
		float newBallX = ball.x + dt * ball.xVelocity;
		float newBallY = ball.y + dt * ball.yVelocity;
		
		    // Check for ball-and-wall collisions
		    if (newBallY + (ball.height/2) >= Futile.screen.halfHeight) {
				newBallY = Futile.screen.halfHeight - (ball.height/2) - Mathf.Abs((newBallY - Futile.screen.halfHeight));
				ball.yVelocity = -ball.yVelocity;
			} else if (newBallY - ball.height/2 <= -Futile.screen.halfHeight) {
				newBallY = -Futile.screen.halfHeight + (ball.height/2) + Mathf.Abs((-Futile.screen.halfHeight - newBallY));
		        ball.yVelocity = -ball.yVelocity;
		    }
				
		// Render the ball at its new location
		ball.x = newBallX;
		ball.y = newBallY;
		player1.y = newPlayer1Y;
		player2.y = newPlayer2Y;
	}

You can find the code used to detect and handle wall collisions by finding the commented line for it. We take the new y value of our ball, add half the balls height, and determine if it is greater or equal to the y value of the top border of the screen. Why do we add half the height of the ball? The anchor and origin for our ball is, by default, set to its center. If we just used the y value of the ball, we would be checking to see if the center of the ball collided with the wall. What we really need to do is check if the top of the ball collides with the wall. In the same if statement, we check to see if the bottom of our ball has collided with the bottom wall. When a collision is detected, the y velocity will be reversed, effectively mirroring the angle at which the ball struck the wall.

UPDATE: In the ball-and-wall collision check, I changed this to prevent rapid collisions. This is not reflected in the webplayer demo or the assets file, but it is reflected now in the code above. I changed this during Part 8 of the tutorial series, so the next webplayer demo and assets file will not have the new collision code either.

Unfortunately, we can’t really test this collision test yet because our ball will never start at an angle that hits a wall. We will need to get the paddle collision detection working first.

Just beneath our wall collision code, add the code below.

		// Check for paddle-and-ball collisions
		Rect ballRect = ball.localRect.CloneAndOffset(newBallX, newBallY);
		Rect player1Rect = player1.localRect.CloneAndOffset(player1.x, newPlayer1Y);
		Rect player2Rect = player2.localRect.CloneAndOffset(player2.x, newPlayer2Y);
		
		if (ballRect.CheckIntersect(player1Rect)) {
			ball.xVelocity = -ball.xVelocity;
			
		}
		if (ballRect.CheckIntersect(player2Rect)) {
			ball.xVelocity = -ball.xVelocity;
		}

The first thing we do is create copies of the rectangles that define the bounds of our sprites at their current locations. In other words, for the purposes of collision detection, we create virtual rectangles (we don’t draw them) that represent the area occupied by our sprites. This is an incredibly basic aspect of collision detection that you should already be familiar with, since teaching this is not within the scope of these tutorials.

We then use the CheckIntersect method to determine if any point on the ball collides with any point on the paddle. The xVelocity is reversed, reflecting the angle at which the ball came in at. Go ahead and execute the code, and you should be able to see the ball bounce off the walls and paddles.

It shouldn’t take long for you to notice a few issues. First, the only thing you can achieve with the paddle is reflecting the ball’s angle. To be fun, you need to be able to ‘aim’ the ball depending upon where it strikes the paddle. Second, if the ball hits the top of a paddle, there is a good chance that the ball will react erratically, ping-ponging back and forth in collision hell. That is because multiple collisions are occurring with the same paddle over and over again.

The latter problem is easy to fix in a hackish manner by changing the if statements to the following.

		// Check for paddle-and-ball collisions
		Rect ballRect = ball.localRect.CloneAndOffset(newBallX, newBallY);
		Rect player1Rect = player1.localRect.CloneAndOffset(player1.x, newPlayer1Y);
		Rect player2Rect = player2.localRect.CloneAndOffset(player2.x, newPlayer2Y);
		
		if (ballRect.CheckIntersect(player1Rect) && ball.xVelocity < 0) {
			ball.xVelocity = -ball.xVelocity;
			
		}
		if (ballRect.CheckIntersect(player2Rect) && ball.xVelocity > 0) {
			ball.xVelocity = -ball.xVelocity;
		}

All this does is ensure that the paddle will only collide with the ball once per volley by checking the direction of the ball. There may be better ways to achieve this, mind you. For discussion purposes, if anyone would like to suggest a different method, post it in the comments for others to learn.

As for being able to direct the ball with the paddle, many Pong games disregard the incoming angle, and assign a new one depending on where the ball strikes the paddle. We’ll be doing the same. First, in your PDGame class, create a BallPaddleCollision function from the code below.

	public void BallPaddleCollision(PDPaddle player, float newBallY, float newPaddleY) {
		float localHitLoc = newBallY - newPaddleY; // Where did the ball hit, relative to the paddle's center?
		float angleMultiplier = Mathf.Abs(localHitLoc / (player.height/2)); // Express local hit loc as a percentage of half the paddle's height
		
		// Use the angle multiplier to determine the angle the ball should return at, from 0-65 degrees. Then use trig functions to determine new x/y velocities. Feel free to use a different angle limit if you think another one works better.
		float xVelocity = Mathf.Cos(65.0f * angleMultiplier * Mathf.Deg2Rad) * ball.currentVelocity; 
		float yVelocity = Mathf.Sin(65.0f * angleMultiplier * Mathf.Deg2Rad) * ball.currentVelocity;
		
		// If the ball hit the paddle below the center, the yVelocity should be flipped so that the ball is returned at a downward angle
		if (localHitLoc < 0) {
			yVelocity = -yVelocity;
		}
		
		// If the ball came in at an xVelocity of more than 0, we know the ball was travelling right when it hit the paddle. It should now start going left.		
		if (ball.xVelocity > 0) {
			xVelocity = -xVelocity;
		}
		
		// Set the ball's x and y velocities to the newly calculated values
		ball.xVelocity = xVelocity;
		ball.yVelocity = yVelocity;
	}

BallPaddleCollision takes the paddle/player that has collided with the ball, as well as the ball and paddle’s new y positions as parameters. The commentes in the code should explain what is happening, but in a nutshell, the further from the center of the paddle that the ball hits, the wider the angle, up to a maximum of 65 degrees. If hit its above the center of the paddle, the ball will be angled up, and if it hits below the center of the paddle, it will be angled down.

Finally, in order to put this function into play, we need to edit our collision checks to make a call to it.

		if (ballRect.CheckIntersect(player1Rect) && ball.xVelocity < 0) {
			BallPaddleCollision(player1, newBallY, newPlayer1Y);
		}
		if (ballRect.CheckIntersect(player2Rect) && ball.xVelocity > 0) {
			BallPaddleCollision(player2, newBallY, newPlayer2Y);
		}

Execute the code and give it a look. Our Pong game is starting to take the form of a game. I chose to change the ball’s velocity to 200.0f since it was a bit slow, and you can do the same if you’d like. Both players can interact with the ball, and even though there are no win conditions present, a player can still ‘win.’ The next tutorial will address this issue, as well as covering scoring and the user interface.

Take me to the next tutorial!

By the end of the tutorial you just read, you should have something that looks like this. You can download the Assets folder for this tutorial here.
Unity/Futile Pong Example (Part 5) – Adding some ball movement and managing input for our Pong game in Futile

By the end of this tutorial, you should have something that looks like this. You can download the Assets folder for this tutorial here.

In the last tutorial, we created a framework for the various objects in our game. There are two paddles, a ball, and a game manager. Let’s see if we can get the ball moving along with our paddles.

Let’s start with our ball, which currently spawns in the middle of the screen and just sits there. There are a few ways to handle the ball’s movement. Instead of assigning an angle to our ball, I will be using velocityX and velocityY. One of the reasons for this is because it will make it really easy later on to handle collisions with the the walls, where we can simply reverse the sign of the velocities. We’ll get to that part later.

In our PDBall.cs file, replace the contents with the code below.

using UnityEngine;
using System.Collections;
 
public class PDBall : FSprite {
	public float xVelocity;
	public float yVelocity;
	public float defaultVelocity;
	public float currentVelocity;
	
    public PDBall() : base("ball") {
		defaultVelocity = 100.0f;
		currentVelocity = defaultVelocity;
    }
}

In addition to velocities for x and y, we will also utilize a default velocity and current velocity just in case we want to increase or decrease the speed of the ball during gameplay later on. We’ll set the default velocity to 100.0f, which will essentially be equivalent to 100 points per second. We can adjust this later if it is too fast or slow.

In our PDGame.cs file, we have a function to reset our ball already in place. Let’s replace it with the code below

    public void ResetBall() {
        ball.x = 0; // Place ball in the center of the screen
        ball.y = 0;
		
		// Ensure that the ball starts at a random angle that is never greater than 45 degrees from 0 in either direction
		ball.yVelocity = (ball.defaultVelocity/2) - (RXRandom.Float() * ball.defaultVelocity);
		// Make sure that the defaultVelocity (hypotenuse) is honored by setting the xVelocity accordingly, then choose a random horizontal direction
		ball.xVelocity = Mathf.Sqrt((ball.defaultVelocity*ball.defaultVelocity) - (ball.yVelocity*ball.yVelocity)) * (RXRandom.Int(2) * 2 - 1);
    }

Don’t be too freaked out by this change. It isn’t all that important if you understand it. Simply put we don’t want the ball to start off traveling straight up, or any angle close to it because it would make for a slow start, so I limit the angle by limiting the vertical velocity.

Also in PDGame.cs, let’s add an Update() function to our PDGame class, which will be called once per frame.

	public void Update(float dt) {
		// Integrate to find the new x and y values for the ball
		float newBallX = ball.x + dt * ball.xVelocity;
		float newBallY = ball.y + dt * ball.yVelocity;
		
		// Render the ball at its new location
		ball.x = newBallX;
		ball.y = newBallY;
	}

The Update function is going to receive delta time (dt) as a parameter from the Update() function in PongGame.cs. Technically speaking, Time.deltaTime does not need to be passed to our Update function since it is a static variable for the globally accessible Time class, but it doesn’t hurt either. We’ll utilize basic Euler integration to calculate our new ball positions, just to keep it simple. Feel free to utilize RK4 or Verlet.

Finally, back in our PongGame.cs file, let’s change our Update function to reflect the code below.

    // Update is called once per frame
    void Update () {
		game.Update(Time.deltaTime);
    }

Execute the code, and our ball should head in a random direction at a velocity of 100 points per second. This will be useful whenever a point is scored and we want to reset the ball. Unfortunately, for now our ball is just going to float away indefinitely.

I would like to focus on handling input before worrying about the ball’s collision detection. In fact, we won’t handle collision detection until the next tutorial, so we’ll fix our lost ball then.

In your PDPaddle.cs file, replace it with the code below.

using UnityEngine;
using System.Collections;
 
public class PDPaddle : FSprite {
    public string name;				// Since paddles are essentially our players, we'll give them a name to display later.
    public int score;				// Our player's current score
	public float defaultVelocity;	// Default velocity
	public float currentVelocity;		// Current maximum velocity
     
    public PDPaddle(string name) : base("paddle")  { // Constructor for our paddle
        this.name = name;			// Set our _name variable to the value passed in the constructor
		
		defaultVelocity = Futile.screen.height; // Our paddle will be able to traverse the height of our screen in 1 second, seems reasonable.
		currentVelocity = defaultVelocity;
    }
}

Just like our PDBall, I want to set a default and current velocity, which will reflect the speed at which they move vertically. By doing this, we can do fun things later on like give one player the ability to slow down the other player, or speed himself up, or even have power ups that the ball can collide with which will do the same.

In PDGame.cs, change the Update() function of the PDGame class to reflect the code below.

	public void Update(float dt) {
		float newPlayer1Y = player1.y;
		float newPlayer2Y = player2.y;
		
		// Handle Input
		if (Input.GetKey("w")) { newPlayer1Y += dt * player1.currentVelocity; }
		if (Input.GetKey("s")) { newPlayer1Y -= dt * player1.currentVelocity; }
		if (Input.GetKey("up")) { newPlayer2Y += dt * player2.currentVelocity; }
		if (Input.GetKey("down")) { newPlayer2Y -= dt * player2.currentVelocity; }
		
		// Integrate to find the new x and y values for the ball
		float newBallX = ball.x + dt * ball.xVelocity;
		float newBallY = ball.y + dt * ball.yVelocity;
		
		// Render the ball at its new location
		ball.x = newBallX;
		ball.y = newBallY;
		player1.y = newPlayer1Y;
		player2.y = newPlayer2Y;
	}

Note that player1 is controlled by w and s, and player2 is controlled by the up and down arrows. I’m not sure if I will cover AI yet, so for now both paddles will be controlled manually.

Execute the code, and you should be able to control both paddles.

As of now, our ball will rip straight through the paddles. Collision detection is going to be the focus of the next tutorial.

Take me to the next tutorial!

By the end of this tutorial you just read, you should have something that looks like this. You can download the Assets folder for this tutorial here.

Unity/Futile Pong Example (Part 4) – Creating the basic structure of our Pong game in Futile

By the end of this tutorial, you should have something that looks like this. You can download the Assets folder for this tutorial here.
Previously, we finally got our feet wet with some C# code for our Pong game. Let us now set up the various objects that are used in Pong. At the very minimum, we need two paddles and a ball.

Like any form of programming, there are many ways to go about designing our game. While this is a very simple game, I will be separating out all of the various classes into their own C# source files for clarity.

  • Create a new C# file in your Scripts folder and name it PDPaddle.cs
  • If you used the Unity editor to create this file, it will automatically create a class extending MonoBehaviour. Since we won’t be attaching this script to a Unity GameObject, there is no need for it to extend MonoBehaviour. Instead, I will extend FSprite to create the paddle.
  • Replace the contents of PDPaddle.cs with the source code below
using UnityEngine;
using System.Collections;

public class PDPaddle : FSprite {
	public string name; // Since paddles are essentially our players, we'll give them a name to display later.
	public int score; // Our player's current score
	
	public PDPaddle(string name) : base("paddle")  { // Constructor for our paddle
		this.name = name; // Set our _name variable to the value passed in the constructor
	}
}

This should be fairly straightforward. Since PDPaddle extends FSprite, and FSprite requires us to pass the name of our sprite as a parameter (you should recall typing paddle = new FSprite(“paddle”) in the last tutorial), we can use the base() keyword to push parameters to our base class.

Next, let’s create the ball class:

  • Create a new C# file in your Scripts folder and name it PDBall.cs
  • Open this file up, and replace the contents with the source code below
using UnityEngine;
using System.Collections;

public class PDBall : FSprite {	
	public PDBall() : base("ball") {
	}
}

This is the framework for our ball. I’m sure we’ll find a way to add some excitement to it later.

With our ball and our paddles defined, it might be a good idea to create a class that can manage our game. It needs to be able to create and control our ball and paddles, as well as handle any other game data.

  • Create a new C# file in your Scripts folder and name it PDGame.cs
  • Open this file up, and replace the contents with the source code below
using UnityEngine;
using System.Collections;

public class PDGame {
	public PDPaddle player1;
	public PDPaddle player2;
	public PDBall ball;
	
	public PDGame() {
		player1 = new PDPaddle("player1");	// Create player1
		player2 = new PDPaddle("player2");	// Create player2
		ResetPaddles();						// Reset the position of the paddles
		
		ball = new PDBall();				// Create our ball
		ResetBall();						// Reset the position of the ball to the center of the screen
		
		Futile.stage.AddChild(player1);		// Add our elements to the stage, making them visible
		Futile.stage.AddChild(player2);
		Futile.stage.AddChild(ball);
	}	
	
	public void ResetPaddles() {
		player1.x = -Futile.screen.halfWidth + player1.width/2;	// Make sure player1 to the left side of screen
		player1.y = 0;											// Recenter player1 vertically
		
		player2.x = Futile.screen.halfWidth - player2.width/2;	// Make sure player2 is on the right side of the screen
		player2.y = 0;											// Recenter player2 vertically
	}
	
	public void ResetBall() {
		ball.x = 0;	// Place ball in the center of the screen
		ball.y = 0;
	}
}

As with our other classes, right now they just contain the basics of getting our game scene set up. Note the use of Futile.screen.halfWidth. This is in points, not pixels, so it should scale well with any resolution. The same goes with the x and y coordinates of the FSprite class. Once we are ready to build an executable, you can test this by running the application and selecting different resolutions. All of the sprites will scale up and down, allowing you to develop for multiple devices with ease. This is one of the core concepts in Futile. Of course, you are free to design your game such that the graphics do not scale if you so desire.

Finally, it is time to instantiate our PDGame class and see how it looks. Replace the contents of your PongDemo.cs file with the code below.

using UnityEngine;
using System.Collections;

public class PongDemo : MonoBehaviour {
	public PDGame game;

	// Use this for initialization
	void Start () {
		FutileParams fparams = new FutileParams(true,true,true,true);
		
		fparams.AddResolutionLevel(480.0f, 1.0f, 1.0f, ""); // iPhone resolution
		
		fparams.origin = new Vector2(0.5f,0.5f);
		
		Futile.instance.Init (fparams); 
		
		Futile.atlasManager.LoadAtlas("Atlases/PongDemo"); 
		
		game = new PDGame(); // Create an instance of PDGame, which will create instances of our paddles and ball
	}
	
	// Update is called once per frame
	void Update () {
		
	}
}

Go ahead and run the code through the Unity editor, and you should see something similar to this:

pongdemo-scene-setup

Next up, we’ll be working with keyboard inputs to make our paddles move, as well as adding some basic ball functionality.

Take me to the next tutorial!

By the end of the tutorial you just read, you should have something that looks like this. You can download the Assets folder for this tutorial here.

Unity/Futile Pong Example (Part 3) – Adding and managing art assets in Futile for Unity

By the end of this tutorial, you should have something that looks like this

In my last entry, I took you through the basics of getting Futile imported into Unity. As exciting as it can be to finally have a blank canvas, especially if this is your first introduction to Unity, an even more exciting part is getting your artwork on that canvas.

For those that used the development_physics branch in the last tutorial, please note that we are now using the development branch, at the caution of author MattRix. Just like the other branches, it can be pulled in normal git fashion, or you can download a zip of the repository.

Since the primary goal of this series is to work our way through a Pong rehash, it would make sense to start with assets we will use for it. I have taken the liberty of creating some truly amazing sprites, a white 8×64 rectangle paddle, and a white 8×8 ball with a bit of transparency. You can create your own, or download the ones I made in ZIP format. Prepare to be dazzled.

If you recall from the last tutorial, I explained that any assets we intend to load need to be in the Resources directory of your project, so let’s create a home for our textures. Right click on the Resources directory in the Project pane and create a new directory. I will name this directory Atlases. So you should now have an Assets/Resources/Atlases path.

Now, why on earth did we name it Atlases?

Futile loads your assets from a texture atlas, also known as a sprite sheet. Essentially, this is a single image that contains multiple sprites. This means that we will need to bake those wonderful art assets I made into a single texture atlas. This may sound like overkill for a Pong demo, but this is a best practice that you should be applying to any game you make. TexturePacker is, perhaps, one of the best tools out there for creating texture atlases. There is a free, unlimited trial version which is perfect for our needs. It has output functions for many different frameworks, and one of those happens to be Unity.

Many of the 2D frameworks for Unity already have an integrated sprite sheet manager. Why should you opt for one that doesn’t? Pretty simple really. Your project will not be as intertwined within the web of Unity, so if you ever decide to part ways with it, your work is easier to migrate. Also, there are some amazing tools that already accomplish what other 2D frameworks try to do within Unity’s editor. Instead of relying on those, I prefer to stick with the trusted, industry standard ones that I am already familiar with. This really is the beautiful part of Futile: it does not try to reinvent the wheel.

Drag and drop paddle.png and ball.png into TexturePacker, and it will automatically create the atlas for you. For the Data Format, select Unity3D. We also need to tell TexturePacker where to save the resulting output. Let’s direct it to the Assets/Resources/Atlases directory we created above, and name the file PongDemo.txt. This text file contains JSON formatted data that will tell Unity how to slice up the sprite sheet. Note that the texture file will be saved to the same path, as PongDemo.png unless you change it. Finally, make sure to disable the Allow rotation option, as this is no longer supported by Futile.

If you are using the free version of TexturePacker, you will need to disable the Trim option, and change the Algorithm to Basic. There might be other limitations that you need to change, but I believe that covers the two. The compression won’t quite be as good as it is in the premium version, but that is not something to worry about for this, or just about any game you will make.

texturepacker-options

Click the Publish button, and in the Project pane of Unity you will notice that Resources/Atlases will now be populated with the two files that TexturePacker created.

Unity will automatically compress and apply bilinear filtering to any new texture that is imported. The result is that the edges of textures may appear blurry from the filtering, and some artifacting may occur as a result of the compression. To achieve crisp, pixel perfect textures, click on the PongDemo.png file within the Project pane, and set the Filtering Mode to Point, and the Format to Truecolor, then hit Apply. There may come a time when you actually want these options set at their defaults, so it would serve you well to know that they exist.

We are now ready to load some textures with just a few lines of code. Back within the Start() function of PongDemo.cs, enter the following:

	void Start () {
		FutileParams fparams = new FutileParams(true,true,true,true);
		
		fparams.AddResolutionLevel(480.0f, 1.0f, 1.0f, ""); //iPhone
		
		fparams.origin = new Vector2(0.5f,0.5f);
		
		Futile.instance.Init (fparams); 
		
		Futile.atlasManager.LoadAtlas("Atlases/PongDemo");

		FSprite paddle = new FSprite("paddle");
		Futile.stage.AddChild(paddle);	
	}

The last three lines are the only ones that have changed since the last tutorial. We load the sprite sheet with a call to atlasManager.LoadAtlas, with the only parameter being the location in the Resources directory to the atlas files. We then instantiate the variable paddle, which is an FSprite object, with the name of the individual sprite’s filename, without the extension. Finally we add the paddle sprite to Futile’s main stage. Execute the code and you should see the paddle in the center of the screen.

pongdemo-first-run-paddle

If you recall, we set the origin (0, 0) of the Futile stage to the center of the screen when setting up our fparams. By default, any sprite you add to the stage will be at this position. To change the position of the sprite before adding it to the stage, we would do the following:

		FSprite paddle = new FSprite("paddle");
		paddle.x = 50.0f;
		paddle.y = -100.0f;
		
		Futile.stage.AddChild(paddle);

And the result:

pongdemo-paddle-offset

Since we are playing with x and y values, let’s try changing them in the Update() loop:

public class PongDemo : MonoBehaviour {
	
	public FSprite paddle;

	// Use this for initialization
	void Start () {
		FutileParams fparams = new FutileParams(true,true,true,true);
		
		fparams.AddResolutionLevel(480.0f, 1.0f, 1.0f, ""); //iPhone
		
		fparams.origin = new Vector2(0.5f,0.5f);
		
		Futile.instance.Init (fparams); 
		
		Futile.atlasManager.LoadAtlas("Atlases/PongDemo");
		
		paddle = new FSprite("paddle");
		paddle.x = 50.0f;
		paddle.y = -100.0f;
		
		Futile.stage.AddChild(paddle);
		
	
	}
	
	// Update is called once per frame
	void Update () {
		paddle.x++;
		paddle.y++;		
	
	}
}

Please note that we added a public declaration to paddle to the PongDemo class so that it will be accessible to Update(). This is known as variable scope, and if you are completely lost by the term, you ought to brush up on your programming skills, as that is beyond the scope (I’m so sorry for the cheap pun!) of these tutorials. Next, we change the FSprite paddle = new FSprite(“paddle”) line to just paddle = new FSprite(“paddle”) so that there is no conflict with the public declaration above. Finally, in the Update() function, which is called once per frame, we increase the x and y values of paddle. Execute the code, and our paddle will levitate away.

To wrap this tutorial up, try playing around with other properties of paddle, such as:

		paddle.color = Color.red;
		paddle.rotation = 45.0f;
		paddle.width = 100.0f;
		paddle.height = 200.0f;

pongemo-red-paddle

Similarly, try creating an instance of the ball, and another instance of the paddle. See if you can figure out how to place the paddles at the edge of the screen, which is one of the things we will be doing in the next tutorial.

Take me to the next tutorial!

By the end of the tutorial you just read, you should have something that looks like this

Unity/Futile Pong Example (Part 2) – Getting started with Futile, a 2D framework for Unity

In my previous post, I introduced Futile, a code-centric, 2D framework for Unity. If you want to know a little more about Futile, then give that a quick read, but this is the post where we will create a project and get started. Much of the content in this post is already covered in the videos created by MattRix. Check those out if you get lost. The entire Futile library works in the free edition of Unity, so there is no need to feel intimidated by the price of Unity Pro.

All of the coding I do will be in C#, as that is my language of choice, and it is also the language that Futile was written in. If you aren’t using C#, you will still be able to follow along and take advantage of Futile with your preferred language. These tutorials are not designed to teach you about the basics of programming, so a basic level of programming knowledge is assumed. I will do my best to explain everything that I can, and will be actively monitoring the comments section to help further.

Alright, let’s get started.

First, let’s go ahead and create a new project in Unity 3 or 4. I am currently running version 4.0.1f2. Version 4.1.2f1 is out, but there is no need for me to upgrade at this time. I will be naming my project PongDemo. You can name yours anything you want.

create-new-project

With our blank project ready to go, it’s time to harness the power of Futile. Futile is available publicly on github in three branches. Currently, the most up-to-date branch is development_physics. This branch contains all of the nuts and bolts of the framework, as well as recent commits primarily focused on physics implementations. I will be using this branch. MattRix warned me about using this branch for the moment, since it is highly unstable. Instead we will be using the development branch.

You can clone the entire branch in the normal git fashion, or click the ZIP button to download the repository as a zip file. I should note that this repository also contains a neat Futile demo which you can open and look at as well on your own.

For the moment, we want to navigate to the Assets folder within FutileDemoProject of the downloaded repository. In that folder, copy the entire Plugins directory. Navigate to the base directory for your app, and you should notice an Assets folder. Anything that is put in this folder will show up in the Project pane within the Unity editor. Similarly, anything you do in the Project pane will be reflected in the Assets folder. Jump into the Assets folder, and it should be empty. If it isn’t empty, don’t stress it. This is where you will paste the Plugins folder that was copied earlier. Alternatively, you could have dragged the Plugins folder right into the Project pane in Unity, and it would accomplish the same goal.

Back in the git repository, copy the Shaders directory located in Assets/Resources. In the Assets directory for your Unity project, create a new directory and name it Resources. In Unity, all assets that are loaded with a Resources.Load call need to be located in Assets/Resources. Since Futile makes use of this API call, we will be putting all of our assets there. Paste the Shaders directory which we copied a moment ago into Assets/Resources.

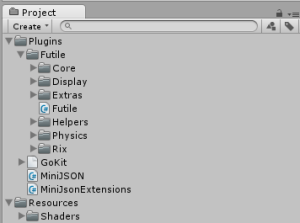
The result is that you should now have PongDemo\Assets\Plugins\Futile and PongDemo\Assets\Resources\Shaders directories, both populated with various files. If you are not well-versed with shaders, don’t get scared off. You can write an entire Unity game with Futile without ever seeing the term again. Tab back over to the Unity window and you notice that this directory structure has been replicated in the Project pane. It should look something like this:

asset-structure-in-unity

The entire Futile SDK is now loaded into your project and ready to roll. But first, a little house keeping. You might have noticed a Main Camera object in the Hierarchy pane of the editor. Typical Unity projects will make use of this, but Futile will dynamically create and manage the camera for us. So let’s delete that by right clicking on it and selecting delete.

In Plugins/Futile there is a C# file named Futile.cs. If you were to take a look into it, you would see that it extends the MonoBehaviour class. In order to take advantage of the MonoBehavior directives, any derivative of MonoBehavior needs to be attached to a Unity GameObject. In order to do that, all we simply do is click on the GameObject menu in Unity, and then Create Empty. In the Hierarchy pane, you will now notice a new GameObject. Right click it and rename it Futile, just to keep things clean and clear, but you can name it whatever you like. Finally, we need to drag the Futile.cs script from the Plugins\Futile path in the Project pane onto the Futile object that we just created. You can look in the Inspector pane and see that the Futile script is attached to the Futile object:

futile-script-attached

With Futile now properly attached to our Futile GameObject, we will create the script that will drive our game. To keep things tidy, create a folder name Scripts in the Project pane, and then right click this new folder and select Create and then C# Script. I am going to name mine PongDemo:

pongdemo-script-created

Just like Futile.cs, PongDemo will, by default, extend MonoBehaviour. You will see that when we open it in a few moments. Since it is a MonoBehaviour, we will attach it to the same Futile GameObject that we attached Futile.cs to. If you are at all confused and overwhelmed by this concept of attaching source code files to GameObjects, don’t panic. This is merely part of the project setup, and it is a prime example of why I don’t like working in the Unity editor itself. Some people love the visual aspect it provides, but I find it rather clunky.

With PongDemo.cs attached to the GameObject, it is time to start getting into some code. Double click on the PongDemo.cs file in the Project pane to open it. Unity comes with a pretty decent IDE known as MonoDevelop. I use it, and have not found much of a reason to look for alternatives, but feel free to do that on your own. PongDemo.cs will open in MonoDevelop, and you will notice that there is already some code in there.

using UnityEngine;
using System.Collections;

public class PongDemo : MonoBehaviour {

	// Use this for initialization
	void Start () {
	
	}
	
	// Update is called once per frame
	void Update () {
	
	}
}

The most important things to note here are the Start and Update functions. Start() is for anything you need to perform before your game loop begins executing. Your main game loop has essentially been created for you already. Update() is how you hook into it. You can have multiple C# scripts that extend MonoBehaviour, each with its own call to Update(). For our game, this call to Update() will be the only one we need, and so this is effectively our main game loop.

There are a few more things we need to do in order to create our game canvas. Type the following code into the Start() function:

	void Start () {
		FutileParams fparams = new FutileParams(true,true,true,true);
		
		fparams.AddResolutionLevel(480.0f, 1.0f, 1.0f, ""); //iPhone
		
		fparams.origin = new Vector2(0.5f,0.5f);
		
		Futile.instance.Init (fparams);	
	}

The first thing we see here is that we are creating a FutileParams object named fparams. These parameters are for mobile devices, and they define which orientations to support. In our case, we will set them all to true, even though they are irrelevant to us right now. In the next line of code we add a resolution level. This is a very useful way of loading assets based upon the screen resolution of the device in use. Once again, we don’t care about this right now and so we are going to ignore the various parameters except for the first one, which can be thought of as the minimum screen width we will support. This happens to be the width in pixels of the older iPhones.

There have been a few references to mobile devices so far. If you don’t intend to develop mobile games, don’t get scared off. While Futile does a great job of supporting mobile devices, it is not intended to be exclusive to the mobile world.

Moving on, we next set an origin for the Futile stage. A Vector2 is merely a representation of a 2 dimensional vector. In this case, we are using it to tell Futile that we want 0, 0 to be at the center of the screen. Finally, we initialize Futile with the fparams we just created, and we are all set.

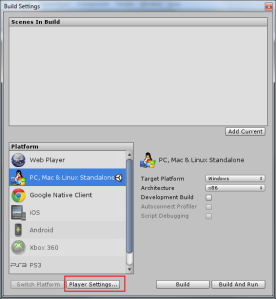
Back in the Unity editor, if you were to execute this code by clicking the play button, you should see a blank, black canvas at the default resolution that Unity sets for every new project. To keep things really simple, we will set this default resolution to 480×320 to match the minimum resolution level we chose to support when we initialized Futile above. To change this, go to File, Build Settings, and make sure the PC/Mac/Linux platform is selected and then click the Player Settings button at the bottom.

build-settings

In the Inspector pane, change the resolution width to 480, and the height to 320.

player-settings

Go back to the main Unity screen and make sure the Unity editor’s built in simulator is set to 480×320, and then run it again:

editor-resolution

This is our scene. It’s so pretty that we should probably save it. Click File, Save Scene, and I’ll name mine PongDemo to be really creative. As with just about anything, you can name yours whatever you wish. At this point, you can feel free to safely close out of Unity and know that all of your work has been saved. This is a very anti-climatic place to end this portion of the tutorial, but hopefully I can get the next one up soon. In it, we will start loading and handling art assets.

Take me to the next tutorial!

Unity/Futile Pong Example (Part 1) – An introduction to Futile, a 2D framework for Unity

Unity is a fantastic engine for independent game developers of all skill levels. Despite an arsenal of API calls for 3D development, it can also hold its own for 2D developers.

In the Unity asset store, you can find great 2D libraries such as 2D Toolkit (paid), SpriteManager 2 (paid), and Orthello (free). All three of these take an editor-centric approach to development. In other words, they integrate into the Unity interface so that you can import and manage 2D assets visually, rather than with code alone. It is important to note that these frameworks can also be utilized via code, but their power is in their Unity editor integration.

Personally, I have always found the Unity editor to be a bit of an obstacle. I want the power of the Unity engine, and all of its cross-platform glory, but I want all of my asset loading and handling to be done in code. That’s where Futile enters the scene. Developer MattRix, author of the hit mobile game Trainyard, created Futile for this very purpose. Developers familiar with ActionScript 3 will notice plenty of similarities with the way Futile is structured. For those that do not come from an AS3 background, fear not, I was in the same boat.

Futile is free, and can not be found in the Unity asset store. Instead, it is housed publicly on github. In a series of posts, I hope to introduce readers to the beauty of Futile, starting first with a basic setup, and then into the hello world equivalent for game development: Pong.

MattRix was already kind enough to provide three videos demonstrating Futile, so feel free to take a look at those first, or you can jump right to my first tutorial when it is finished, which is aimed at creating a new Unity project and integrating it with Futile.

Take me to the next tutorial!